


Table of contents
- what is portainer?**
- what it does ?
- what can you do with portainer ??
- How Portainer Works
- Install Portainer
- Connecting to Portainer
- The Portainer home screen
- managing containers
- Overview of Portainer architecture
- experience about portainer
- Using Portainer to Manage Docker
- How do I View my Container Status?
- How do I run a container?
- Conclusion
Topics covered
About portainer
installation guide
container management
Portainer architecture (overview)
experience about portainer
intresting about portainer
what is portainer?**
Portainer is a famous Docker UI that assists you with imagining your holders, pictures, volumes and organizations. Portainer assists you with assuming command over the Docker assets on your machine, keeping away from extensive terminal orders.
Portainer as of late arrived at variant 2.0 which added help for Kubernetes groups. The instrument additionally upholds Docker Swarm and Azure ACI conditions. In this instructional exercise, we'll keep it straightforward and utilizing Portainer to deal with a neighborhood Docker establishment.
Two releases of the product are accessible, the free and open-source CE and Business. The additional abilities of Business are generally centered around upgraded admittance, amount the board, and head controls.
(Simply portainer is a dashboard in kubernetes while managing containers and easy way to manage your containers)
what it does ?
It is for early stage devops for starting their work on automation.
It offers many functionalities.
what can you do with portainer ??
Mainly deploy and see the state of individual container , restart them and debug them necessary.
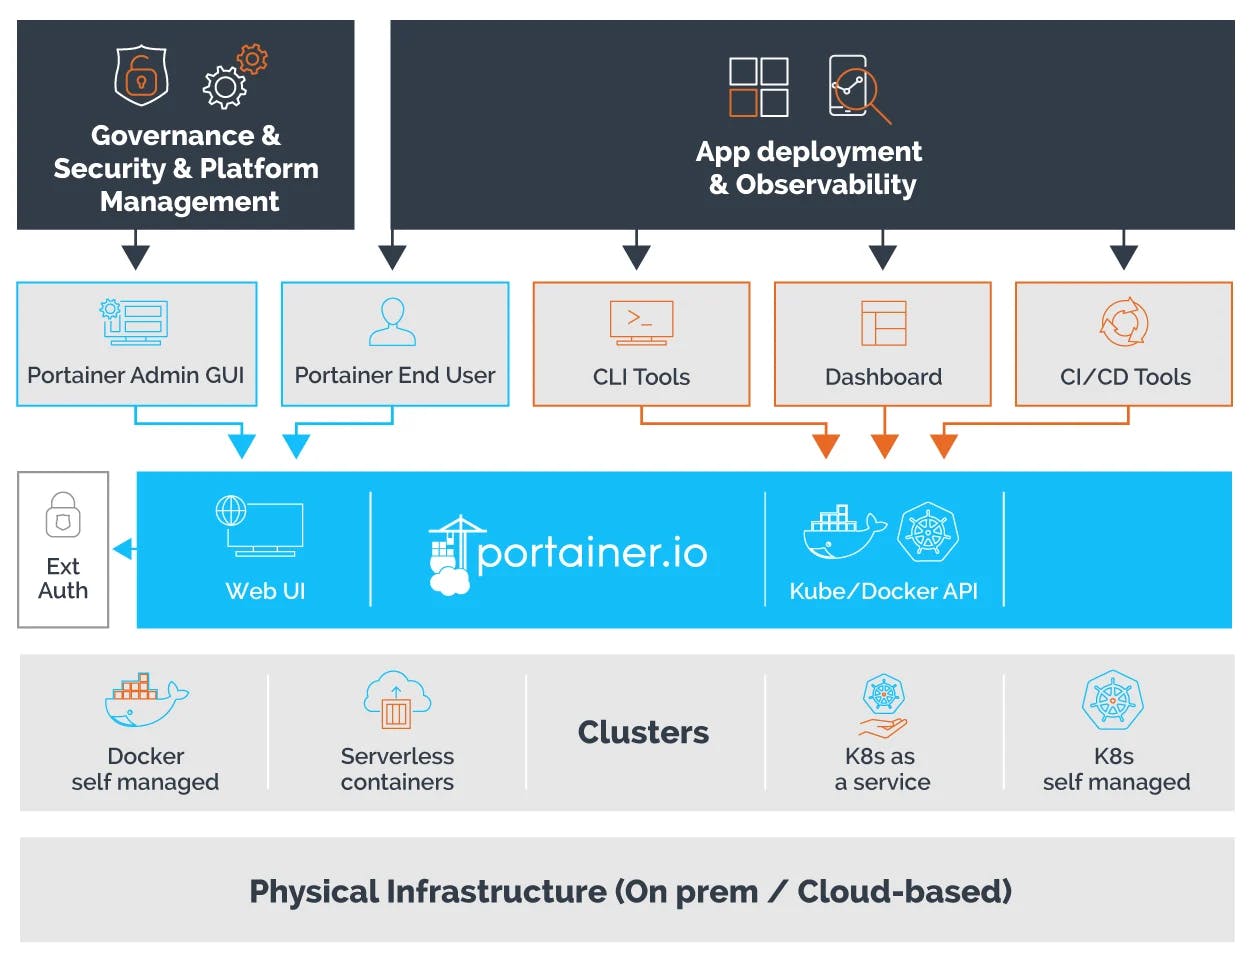
How Portainer Works
 The Kubernetes compatible API, which is part of both Porrtainer CE and Portainer BE, allows Portainer to be used as the security conduit between third-party developer tools and clusters. It enables developers to use any tool they like whilst having their access permissions managed by Portainer.
Portainer is tested against Docker on Windows, Docker on Linux/AMD64, Docker on Linux/ARM64, Kubernetes on Linux, and Azure ACI. It is validated against the current version of Docker/Kubernetes at the time of each release as well as being validated on the two prior major versions.
Portainer is a ‘universal’ container management platform. It can be deployed inside any Kubernetes, Docker or Docker Swarm environment and, once deployed, can be used to simplify deployment of containerized apps, triage performance problems and manage platform governance. It can be deployed on-prem, in the cloud, across hybrid cloud and at the edge, giving users visibility across multiple container environments through a single interface.
Portainer is distro-independent and thus does not allow you to create clusters unless you are a Digital Ocean, Linode or Civo customer, in which case you can now create Kubernetes clusters from within the tool
The Portainer platform consists of the Portainer Server and the Portainer Agent. Both the Server and the Agent run in containers inside your environment. An instance of the Agent must be deployed on every node in the clusters you want to manage and be configured to talk back to the central Server for Portainer to operate. A different, lightweight version of the Portainer Agent is required for edge / IIOT deployments to communicate back to the server.
Install Portainer
Make sure you’ve got Docker installed and running before proceeding any further. Docker is required for all Portainer features to be fully supported.
First of all, you’ll need to create a new Docker volume. Portainer will use this to store its persistent data. Ours is going to be called portainer_data.
```docker volume create portainer_data
```docker run -d -p 9000:9000 --name=portainer
Next, use Docker to start a new Portainer container:
This command will pull the portainer/portainer-ce image and start a new container from it. The container will be detached and executing in the background (-d).
The volume created earlier is mounted to /data within the container, where Portainer stores all its application data. The host’s Docker socket is also mounted into the container, so that Portainer has access to your machine’s Docker instance. Finally, port 9000 on the host is bound to port 9000 within the container. This is the port Portainer exposes its web UI on.
Connecting to Portainer
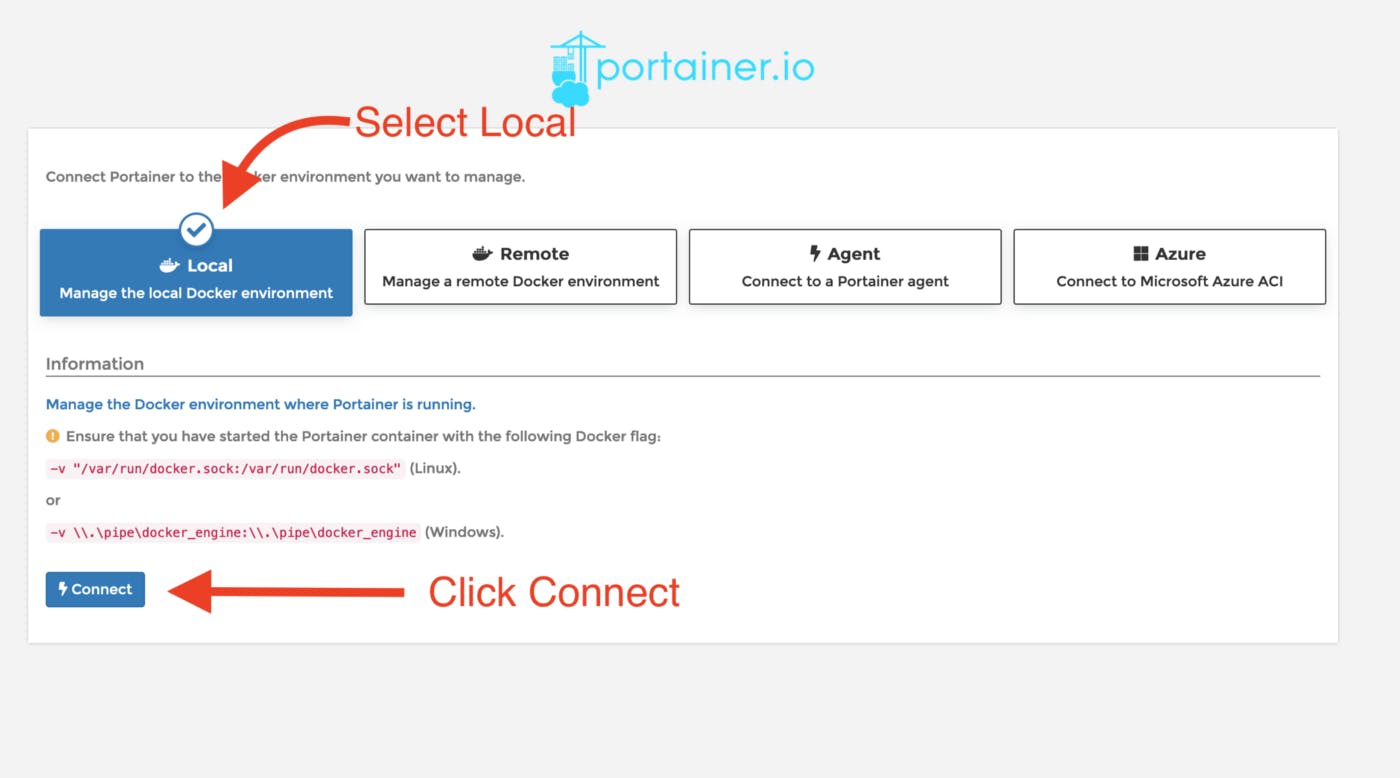
Installing Portainer was easy and connecting to it, is just as easy. Open a web browser and visit localhost:9000
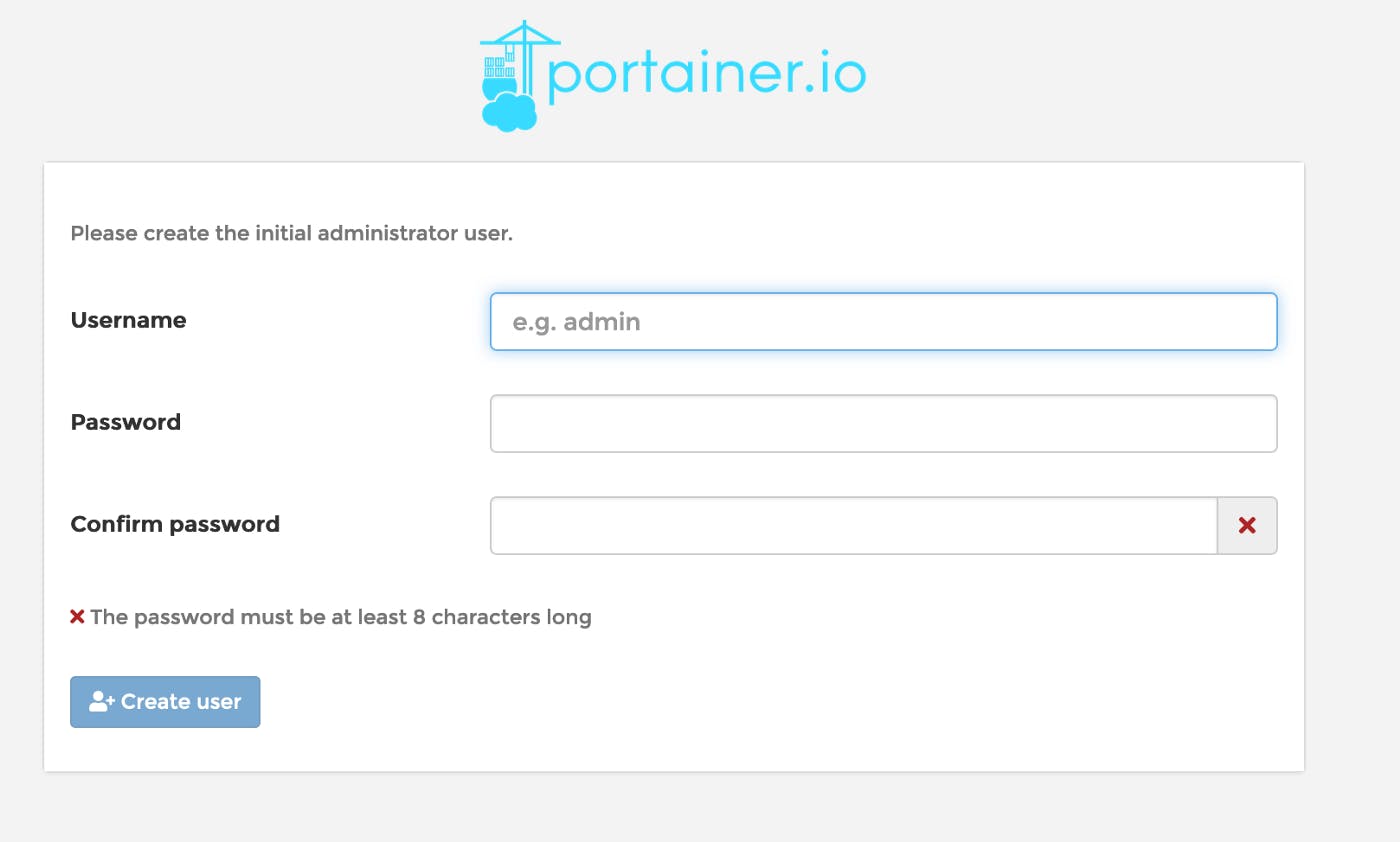
The default user name is admin as this is the first time you have logged in, you will be asked to create a new password and confirm it.
On the next screen, select Local and click Connect
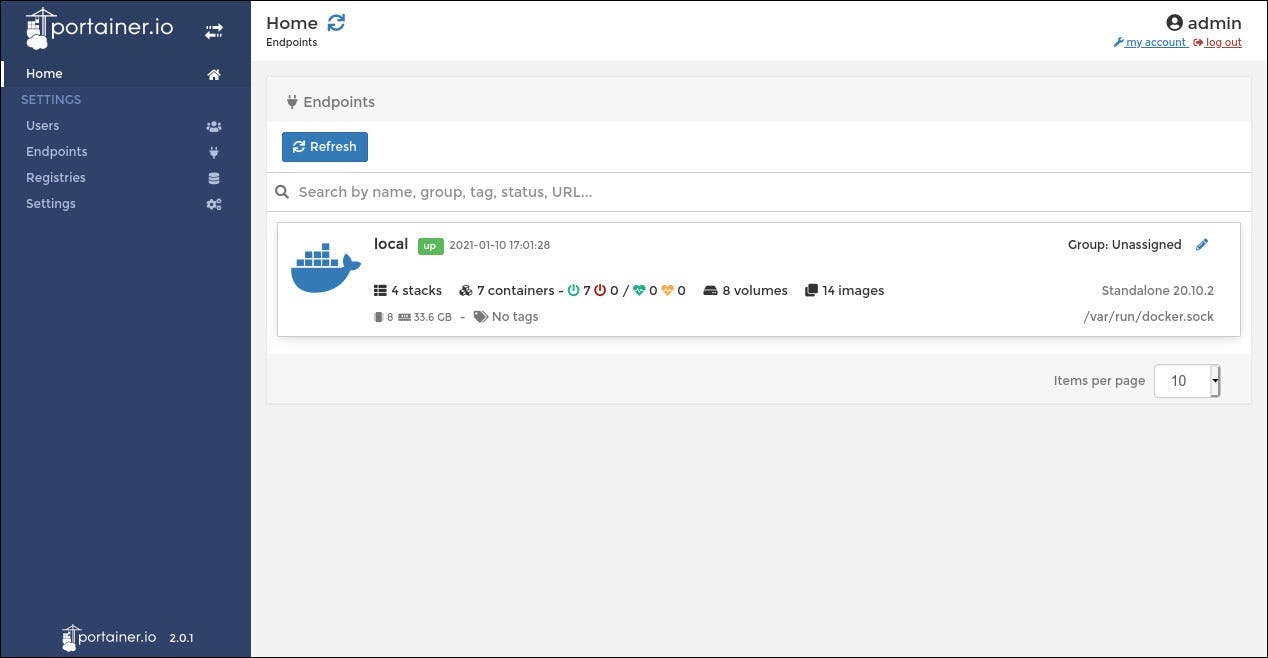
The Portainer home screen
The Docker instances that Portainer knows about are displayed in the central portion of the screen. There will only be one at this time, “local”. On the left is a menu that offers many of the options you would have in the Docker command line plus many more.
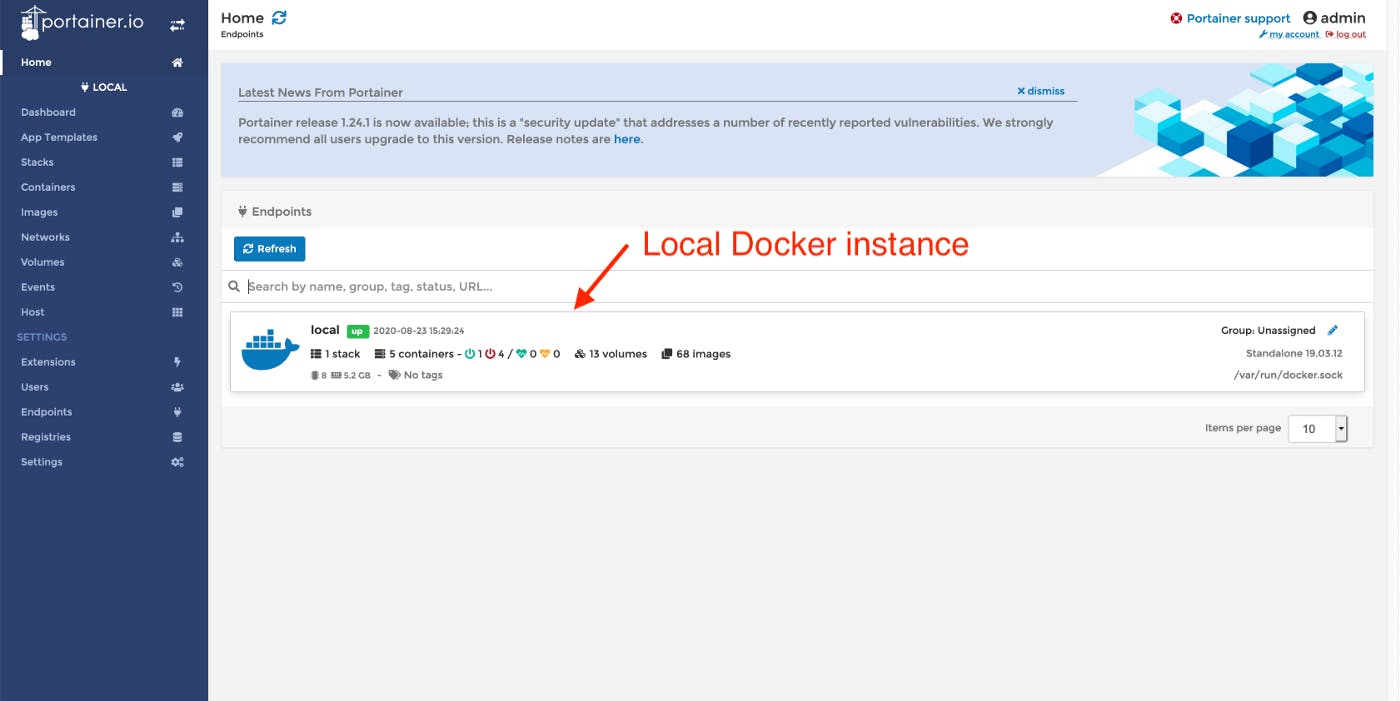
Click the Local Docker instance, to see the Dashboard showing a high-level overview of what is currently running in Docker.
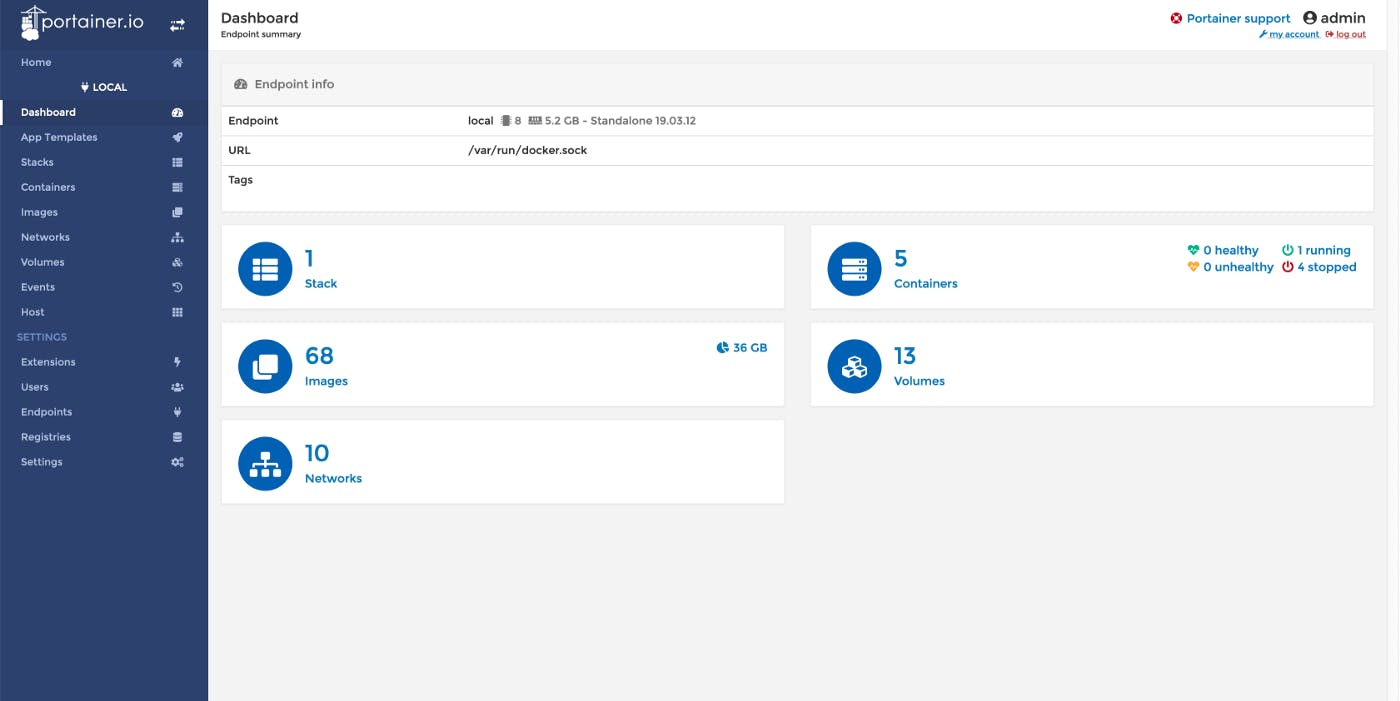 Unless you have already been using Docker, you won’t have much running yet.
managing containers
You’re now ready to begin using Portainer to interact with Docker. From the homescreen, click your “local” endpoint. It will become selected within Portainer, giving you access to the full management UI. You’ll arrive at a simple dashboard giving you an overview of your containers, images and volumes.
Click “Containers” on the dashboard or in the sidebar to open the container management screen. You’ll see a table displaying all your Docker containers.
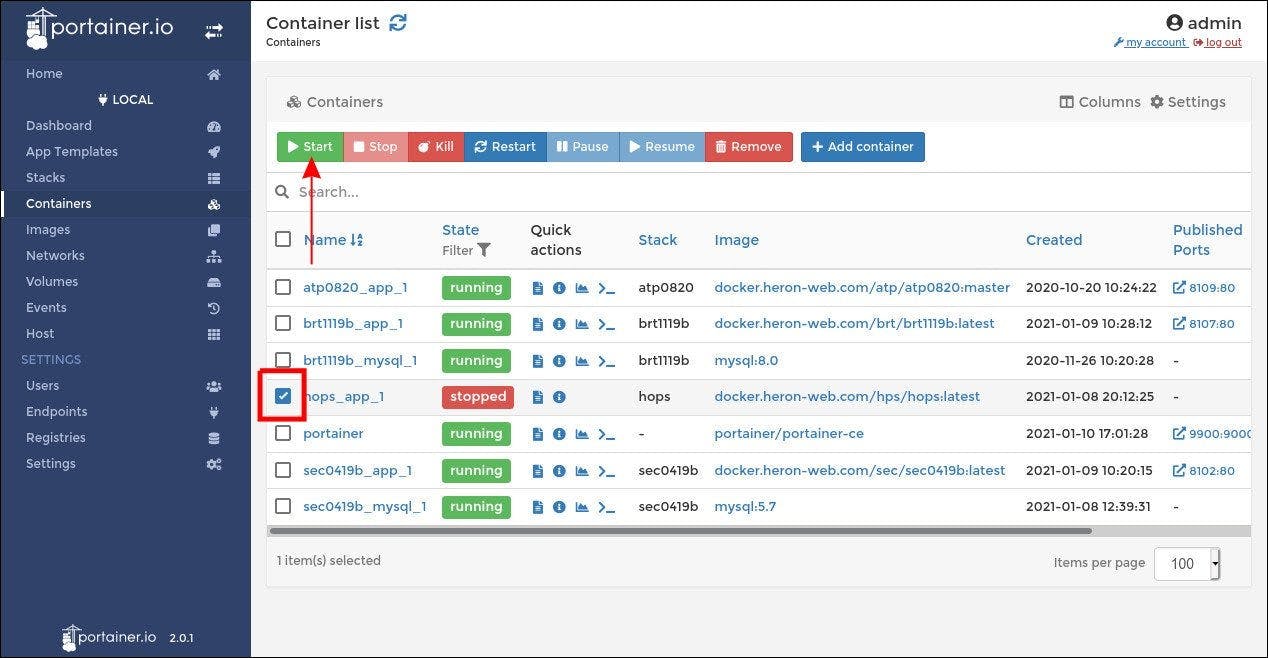
To take an action against a container, click the checkbox next to its name. You can now use the button row at the top of the screen to start, stop, restart or remove the container. Containers which are currently running will show a green “running” state while stopped ones get a red “stopped”.
If you’re using a fresh Docker installation, your only container might be Portainer itself. Take care not to stop this container, as it’s serving the Portainer web UI you’re using!
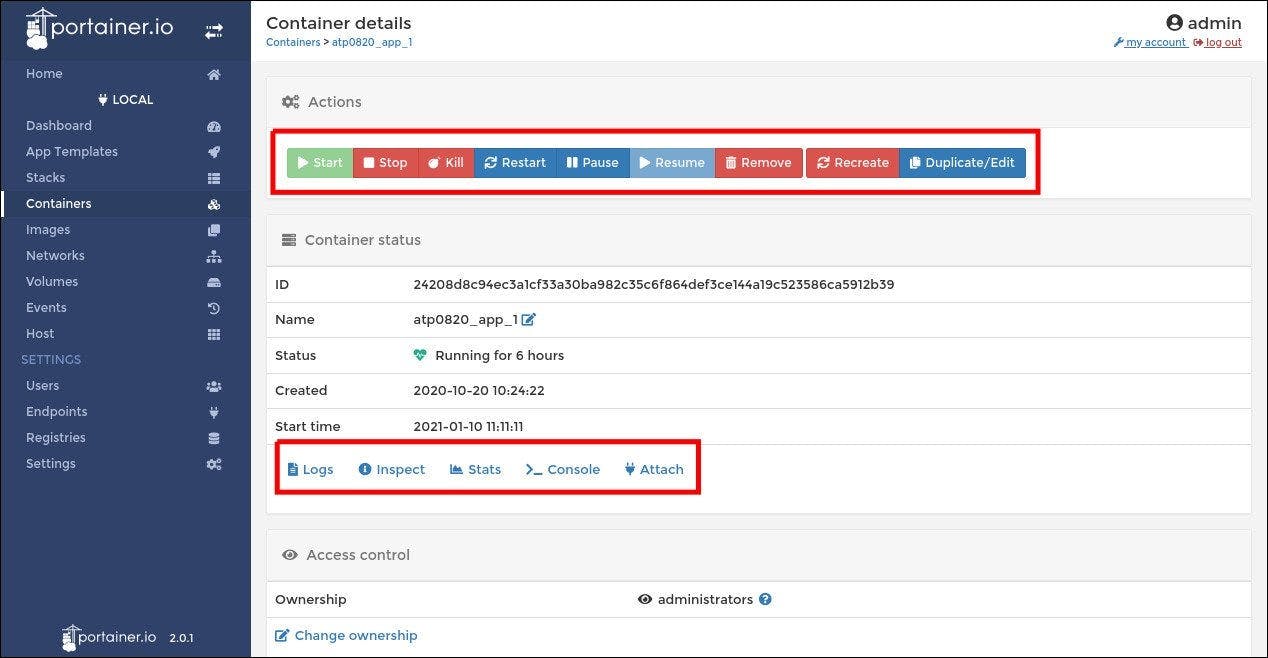
Click the name of a container to view and change its details. This screen allows you to inspect the container’s properties, create a new Docker image from its current state and manage its network connections.
At the top of the screen, you’ll find five buttons under “Container status” that allow you to view the container’s logs (“Logs”), inspect its Docker manifest (“Inspect”), view resource usage statistics (“Stats”), access an interactive console (“Console”) or attach a console to the foreground process in the container (“Attach”).
Overview of Portainer architecture
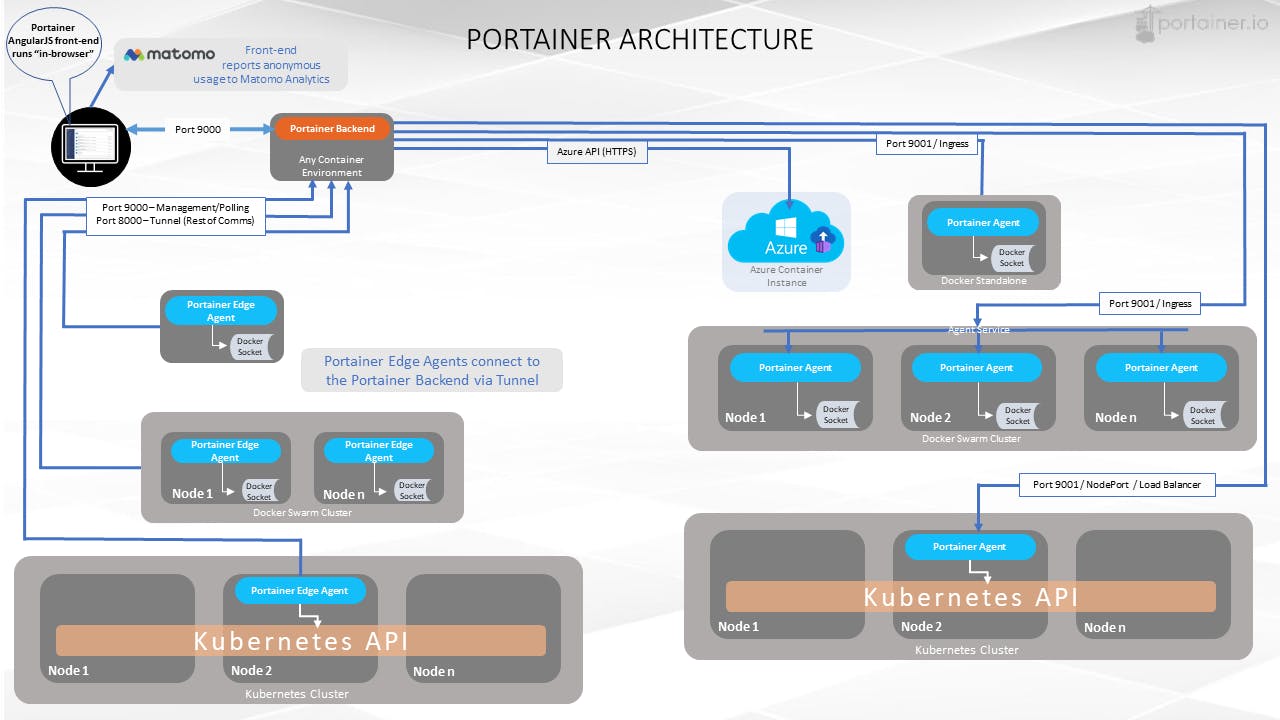
Portainer consists of two elements: the Portainer Server and the Portainer Agent. Both run as lightweight containers on your existing containerized infrastructure. The Portainer Agent should be deployed to each node in your cluster and configured to report back to the Portainer Server container. A single Portainer Server will accept connections from any number of Portainer Agents, providing the ability to manage multiple clusters from one centralized interface. To do this, the Portainer Server container requires data persistence. The Portainer Agents are stateless, with data being shipped back to the Portainer Server container.
experience about portainer
Using Portainer to Manage Docker

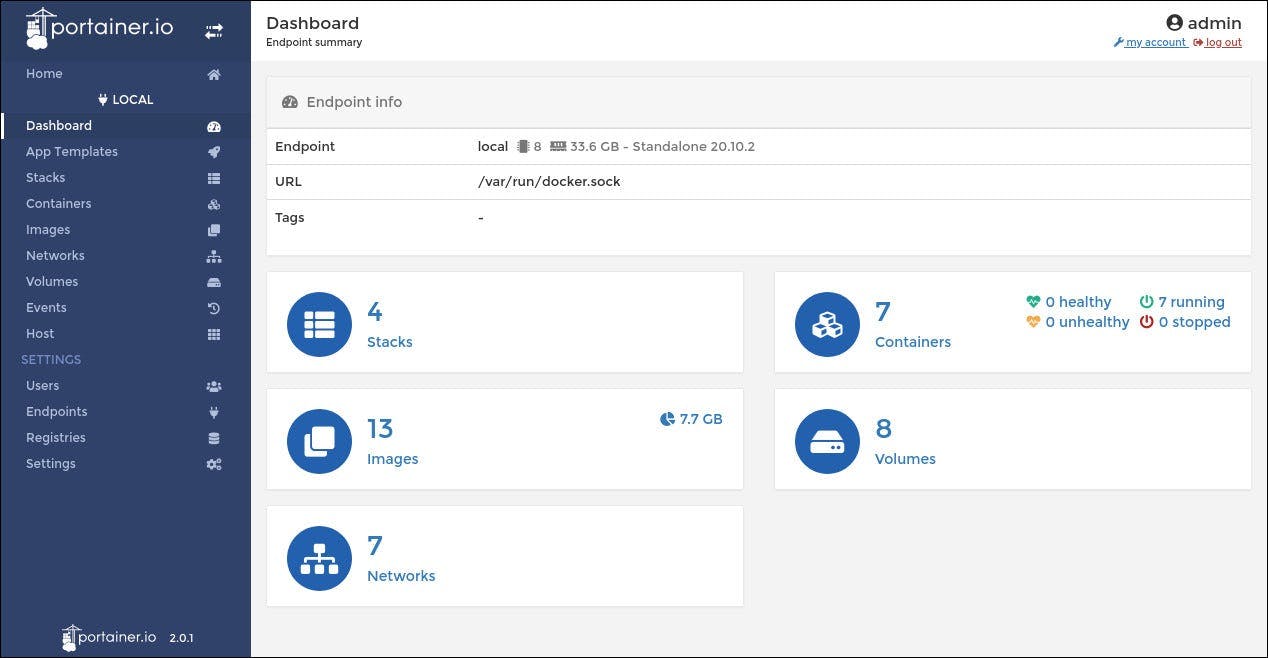
Portainer dashboard Once you login to Portainer you will be presented with the home screen. If you set-up Portainer properly, then you should see your local docker server on the screen. You can click that server to view your dashboard.
The main navigation menu is in the left sidebar. From the sidebar, you can view your dashboard, running containers, volumes, networks, images, and more
How do I View my Container Status?
To view the status of your running containers, click the Containers link on the left sidebar. If you have containers running, your screen will look similar to the image below.
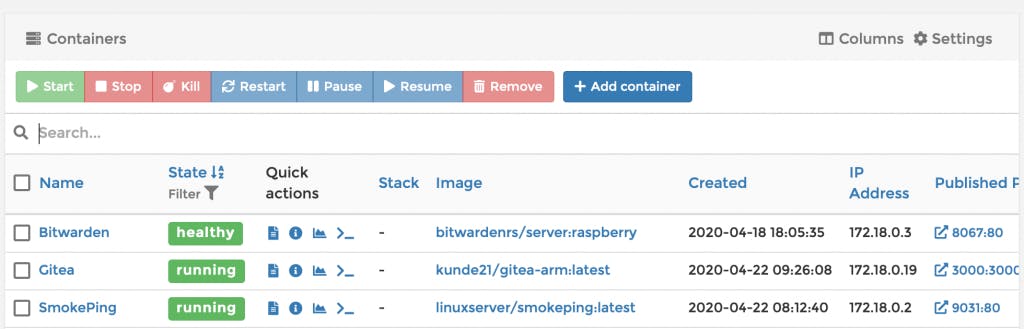
At a glance you can see important information such as name of the container, state of the container, the image that the container is using, the the containers internal IP address, and the exposed container ports that you can access.
From this screen, you will be able to perform most of the basic functions to control your containers.
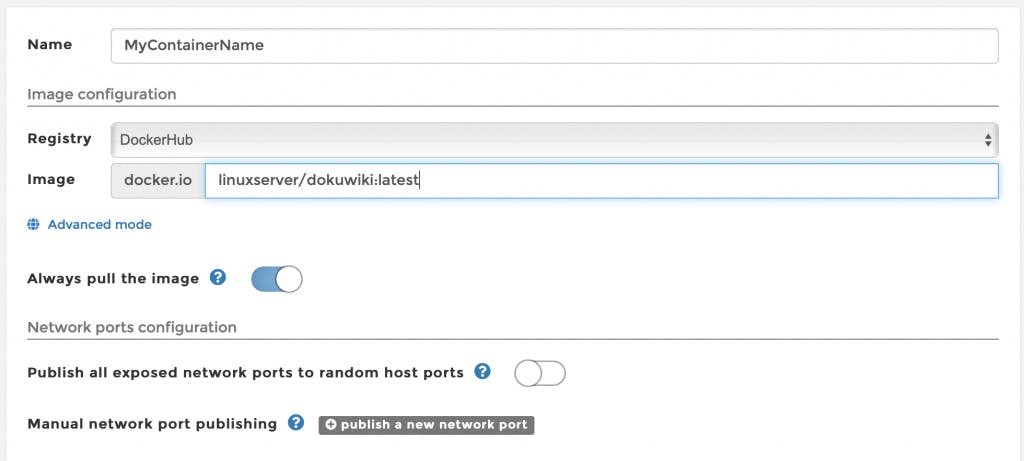
How do I run a container?

In order to run a container, you can click the button labeled + Add container. Once you click the button you will be directed to the “Create a container” page.
Conclusion
Overall, Portainer is a simple, but powerful application that makes controlling and managing Docker very easy for those of you who prefer not to work with Docker via the terminal. I place Portainer behind a reverse proxy in order to be able to easily access it from outside of my home network. This allows me to control my services remotely should something go wrong.